Did you know that before you go live on Twitch for others to see you, you can actually do a test stream to make sure everything is working right? Keep reading to learn how to do a test stream on Twitch.
How To Do A Test Stream On Twitch
- Go to inspector.twitch.tv and click “Login with Twitch”
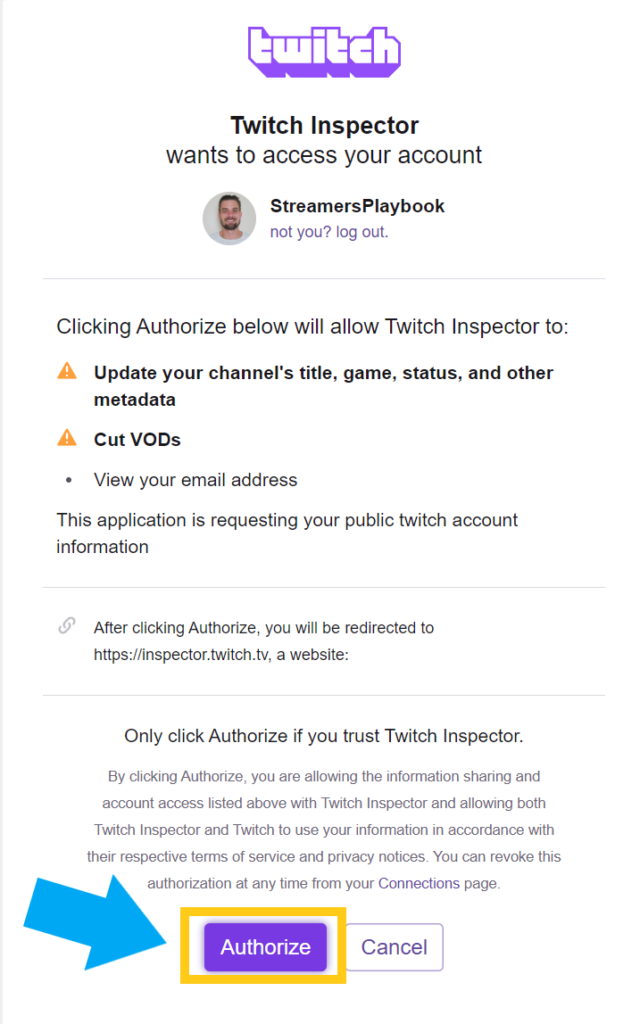
- Authorize Twitch Inspector to have access your Twitch account
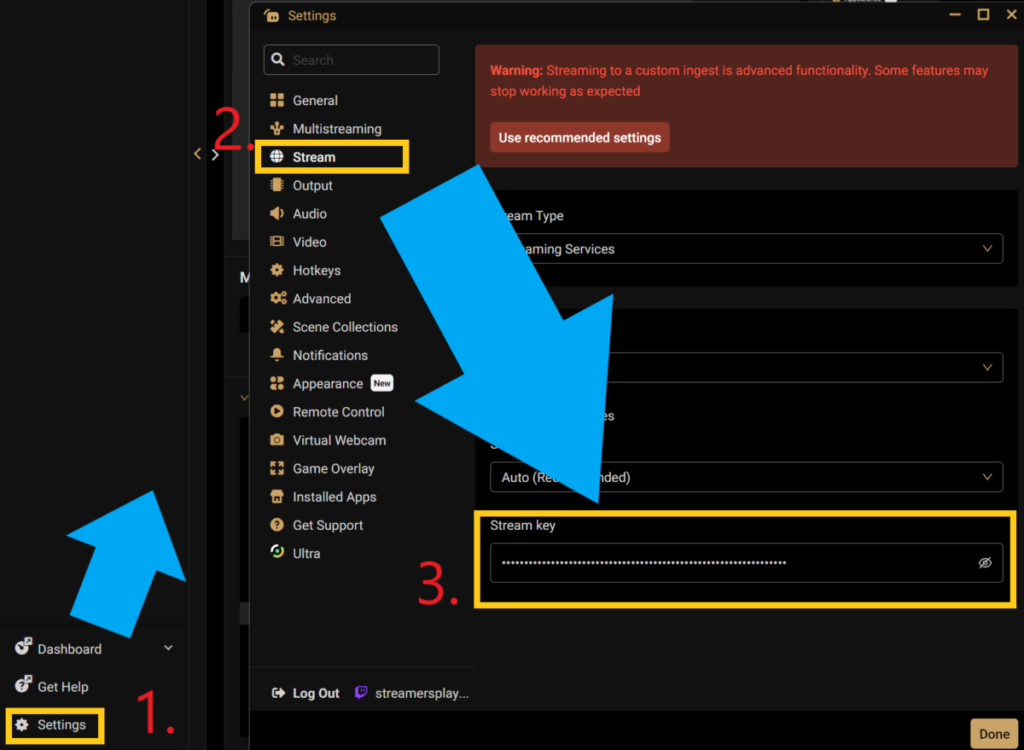
- Next, open your streaming software (i.e. Streamlabs) go to your settings, then click “Stream”
- Go down to the “Stream Key” section and add the code ?bandwidthtest=true to the end of your stream key and save it (if your stream key is not there then add it first, followed by the code)
- Now start your stream and return to inspector.twitch.tv
- Here you will be able to view things like your bitrate and fps to see how your stream would perform if you were live
Here are some screenshots to help provide more detail:
Go to inspector.twitch.tv and click “Login with Twitch”.

Authorize Twitch Inspector to have access your Twitch account.
Open your streaming software, go to your settings, then click “Stream”. Go down to the “Stream Key” section and add the code ?bandwidthtest=true to the end of your stream key and save it (if your stream key is not there then add it first, followed by the code)
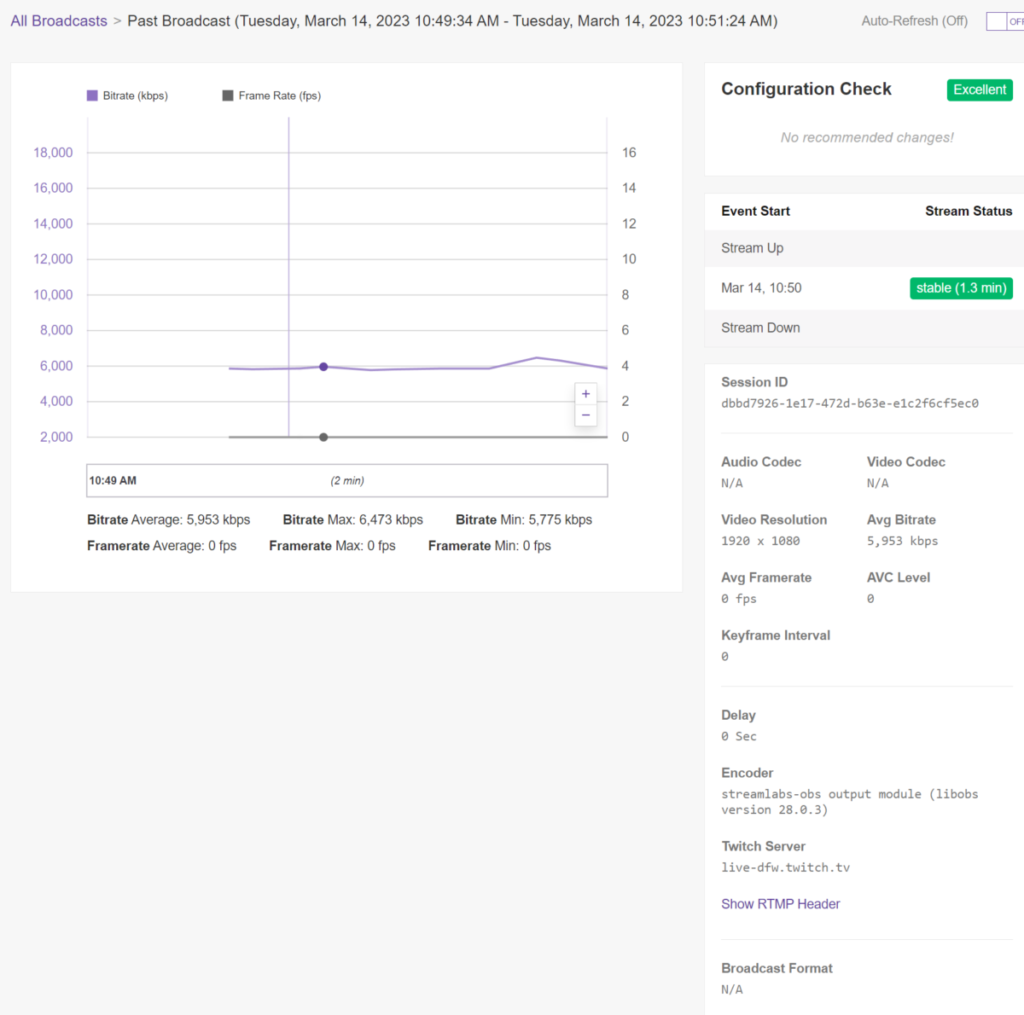
Now start your stream and return to inspector.twitch.tv. Here you will be able to view things like your bitrate and fps to see how your stream would perform if you were live.
If you have followed all of the steps properly, and your streaming software is preventing you from going live to test your stream, then try logging out and logging back in. Streamlabs was not allowing me to run a test stream and so I logged out and then logged back in and it worked fine.
Here is a video on my Youtube channel describing how to do this as well.
Additionally, your Twitch stream key should already be saved on your streaming software if you have gone live before, but if it’s not there, here is how you would locate your Twitch stream key.
How To Get Your Twitch Stream Key
- Log into your Twitch account
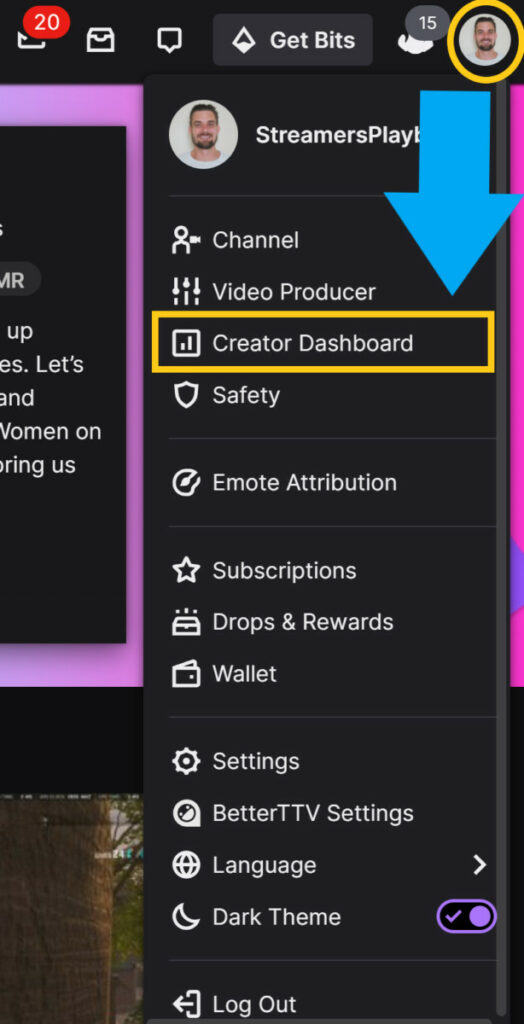
- Click on your profile icon and go to your “Creator Dashboard”
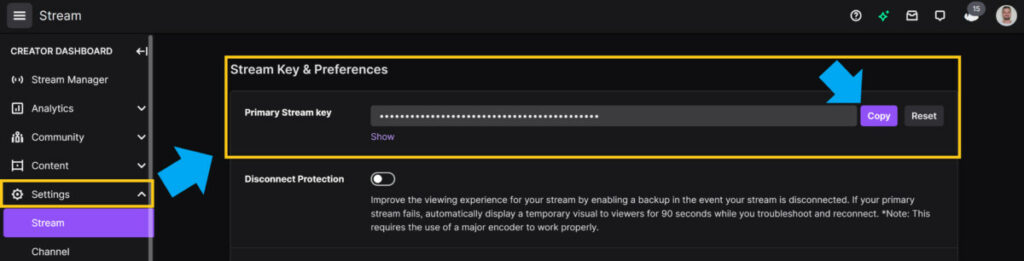
- On the left side click “Settings”, then “Stream”
- Under the “Stream Key & Preferences” section copy your “Primary Stream Key”
Once you have this key copied, paste it into your streaming software, followed by the code, and your test stream is ready to go. Also, never share this stream key with anyone. A person who has access to your stream key could use it to hack your account so be careful.
Now let’s talk a little bit more about test streams and answer some common questions that people have regarding them.
What To Look For In A Test Stream?
So, you’ve done your test, but what do the numbers mean? Let’s talk about the 3 main things you need to look at while running your test stream: Bitrate, Server Location, and FPS.
Bitrate
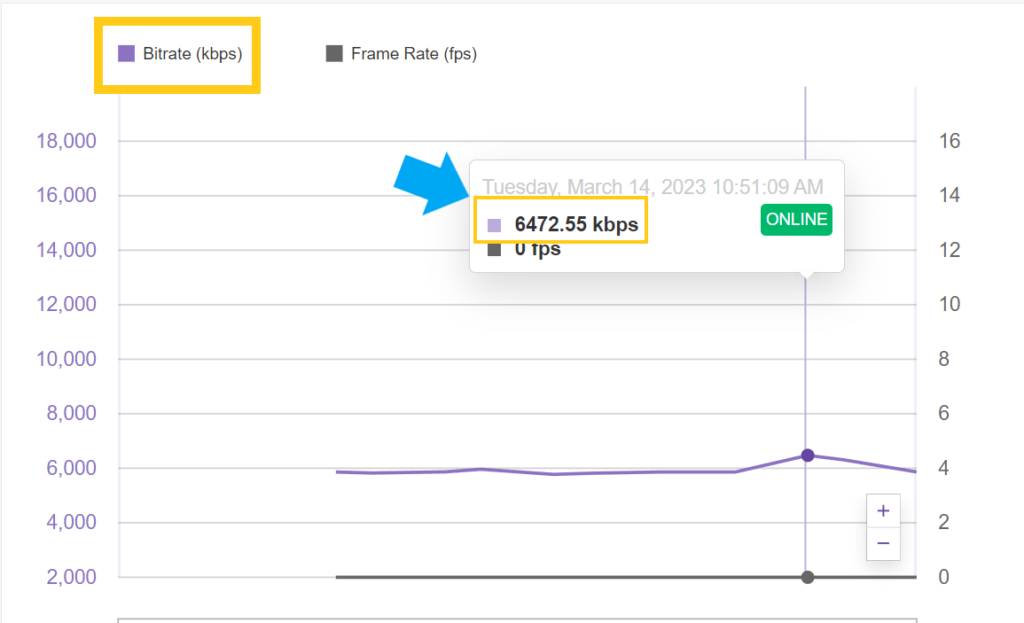
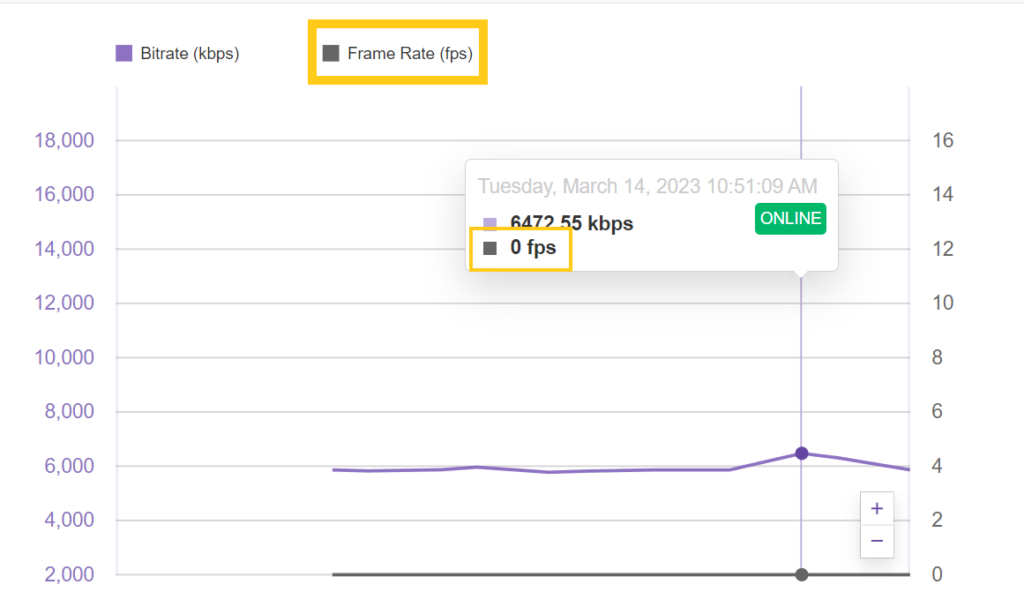
Bitrate is the amount of data you send to Twitch. For streams running at 1080p and 60 fps, which is the highest quality stream Twitch offers, Twitch recommends a bitrate of 6,000 kbps or higher.
For streams below 1080p and 60 fps, Twitch recommends at least 4,500 kbps. As you can see in my test stream, my bitrate was 6,472.55 kbps meaning I would be able to stream at max quality.
If your bitrate is low, you can improve it by doing things like using a wired instead of a wireless connection, closing background apps on your computer, adjusting your video quality, adjusting your fps, and upgrading to better internet.
Server Location
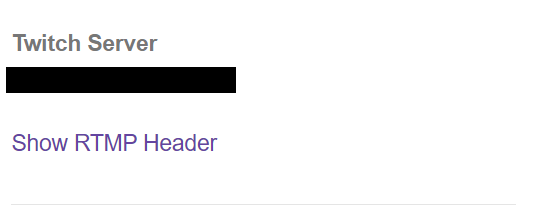
To the bottom right of the test stream screen you want see which Twitch server Twitch is using to broadcast your stream. Make sure that the server they are using is a server that is close, or relatively close to you.
For example, if you live in Los Angeles and you realize the server they are using is in New York, then you may want to fix this. This most often happens to those who use VPNs so consider pausing your VPN while you run the test stream just to make sure you are linked up to the right server.
FPS
FPS is the the last major thing you should consider when testing your stream. Your FPS should be between 30 FPS and 60 FPS depending on the game you are playing.
If your FPS falls below this range then your stream might skip and lag. If your FPS is low, try adjusting the settings of your game first and then your stream to try and fix it.
Since your FPS is being tested, it’s important to play a game while you test your stream. But keep in mind that the FPS of the game you play may be different than your stream’s FPS and that is fine. Twith’s max FPS is only 60.
For a complete list of Twitch’s recommendations regarding bitrate, FPS, and more, check out their guide here.
How Long Should Your Test Stream Last?
When you are running a test stream on the Twitch Stream Investigator tool, it is best practice to run the test for between five and ten minutes.
And remember, that’s while streaming with your streaming software, running the game you want to stream, having other apps like Discord running, and your camera rolling.
Given that length of time, it is likely that the test will be fairly accurate and indicative of the sorts of results your live stream will achieve.
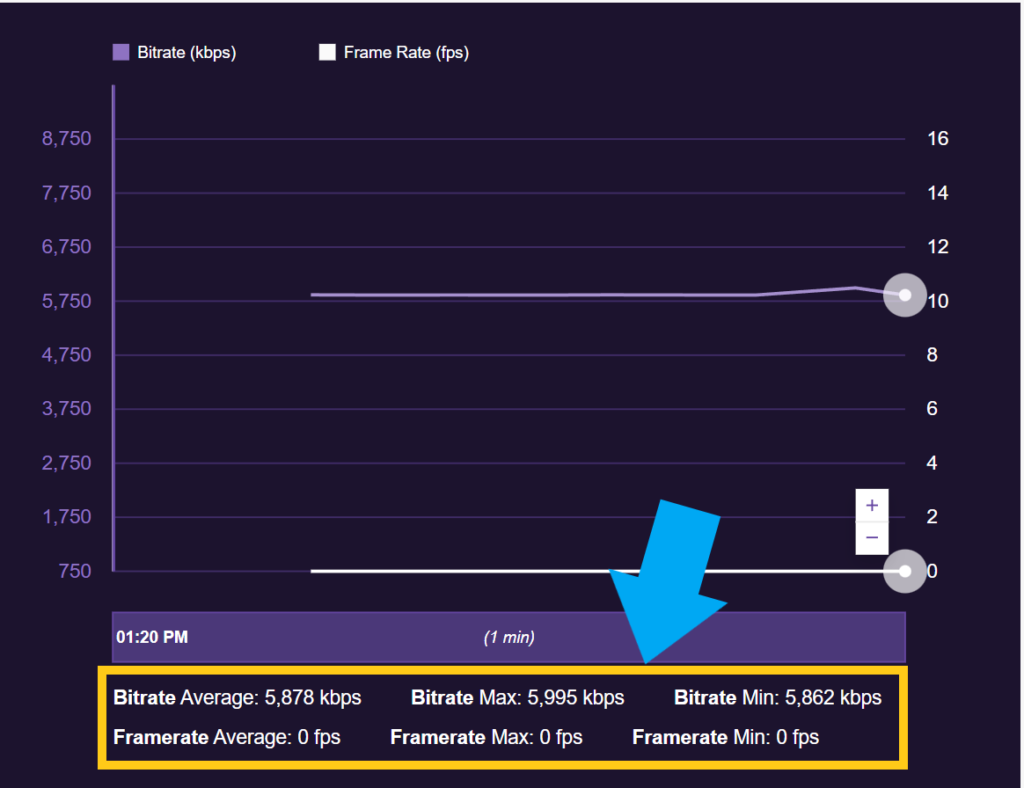
The test also gives you averages at the bottom of the graph of how well your bitrate and FPS are performing. The longer you test, the more accurate that average will be.
How To Test Your Stream Audio Before Going Live On Twitch
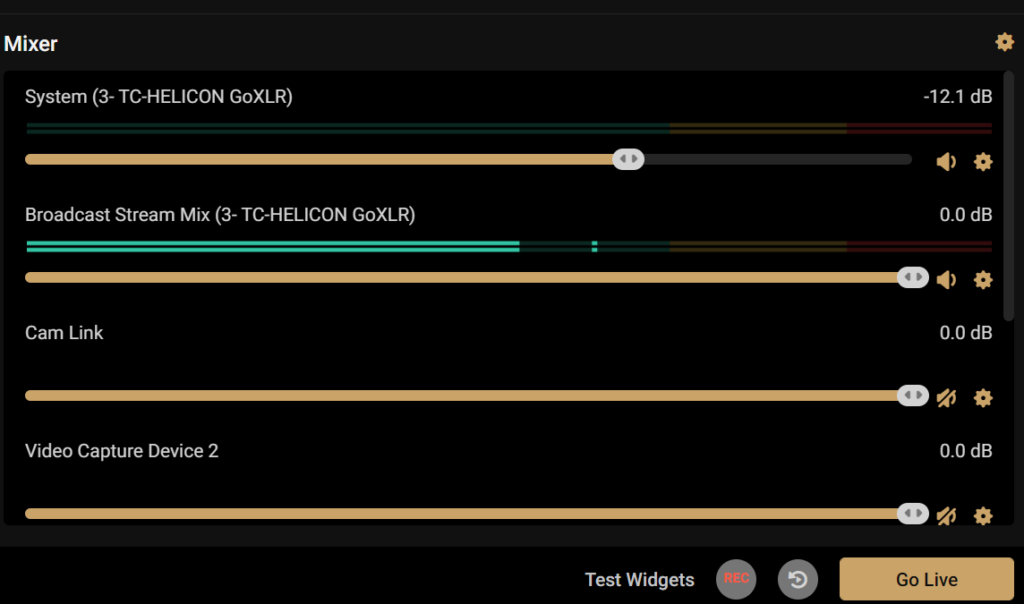
To test your stream audio before going live, record a 15-30 second clip of yourself on your streaming software (OBS, Streamlabs, etc.) playing the game you plan to stream and speaking into your microphone. Once you’re done recording, go back and listen to the clip to make sure the audio sounds good.
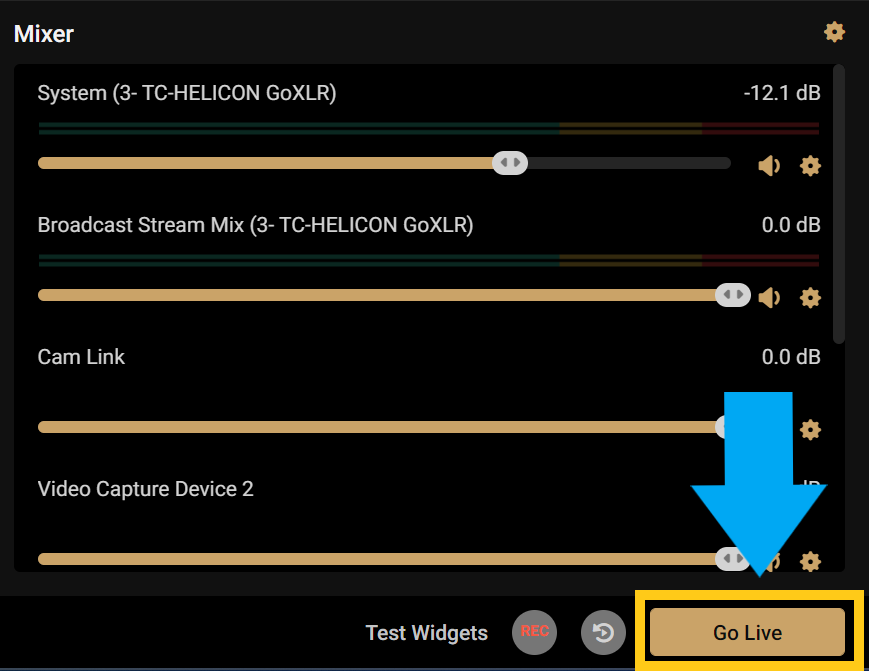
If the audio sounds good, then your audio is ready to be streamed live. If it needs adjustments, then head over to the volume mixer and adjust the volume accordingly.
There are other tools and websites you can use to test your audio, but I find it best to use your streaming software since your streaming software is what you will be using to stream.
Testing your audio with another tool or website might give you different results than your streaming software gives you. The streaming softwares pick up game audio as well which is crucial.
Why Do A Test Stream Before Your Live Stream?
It’s best to do a test stream before going live to make sure everything is working properly. If you start your stream, and begin having some technical issues, you may have to restart your entire stream.
Having to restart your live stream may not seem like a big deal, but it actually is. When you end a stream, some of your viewers may leave to a new stream and never return.
Now many of your viewers will probably still return, but why take the risk. Even if you don’t have to end your stream, but still need to fix something on your stream, it still takes away from you interacting with your viewers.
To me it’s worth spending an extra 5-10 minutes before going live to test everything out that way you are not having to fix it while you are live which can ruin the energy of your stream.
Are Twitch Test Streams Done Offline?
Twitch test streams are done offline, meaning you won’t go live on Twitch while the test is being performed; however, you will need an internet connection in order to run the test.
This is because the Twitch stream test will look at things like the server you are connected to as well as your bitrate. Both of these things need an internet connection in order to work.
But luckily, there are things you can test offline such as your audio, your camera, your lighting, your game, your overlays, and your recording software if you plan on recording your stream.
Test streams are important and I recommend everyone use them. They are especially important for new streamers who want to make sure they have everything set up just right.
For even more streaming tips and how-to content check out my Youtube channel here. And if you want to check out my streams then stop by my Twitch channel here.
Eric streams 3 days a week on Twitch and uploads weekly to Youtube under the moniker, StreamersPlaybook. He loves gaming, PCs, and anything else related to tech. He’s the founder of the website StreamersPlaybook and loves helping people answer their streaming, gaming, and PC questions.