As a streamer I like to have Twitch VODs for my viewers to watch when I am not live; but other streamers prefer to have less VODs on their channel or don’t like VODs period. Below I show you how to delete Twitch VODs or save them for longer use.
How To Delete Twitch VODS
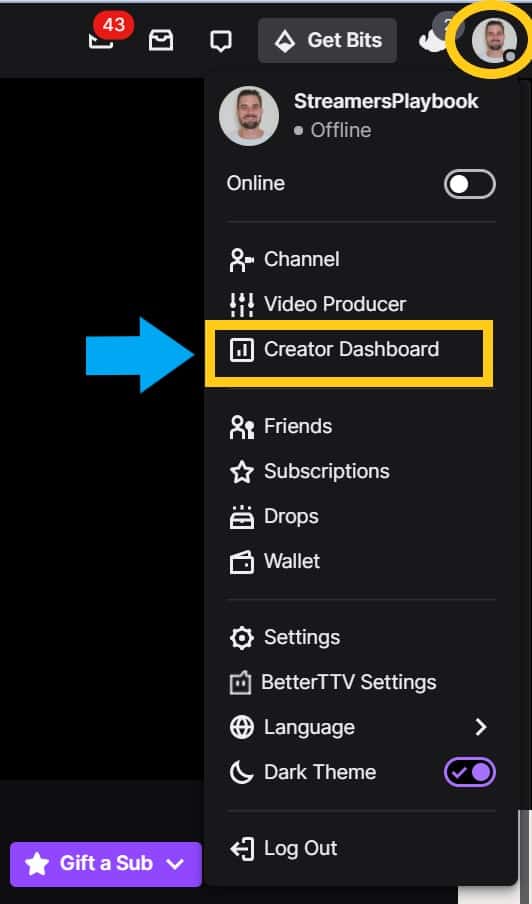
- Log into your Twitch account.
- Click on your profile icon and go to your “Creator Dashboard”.
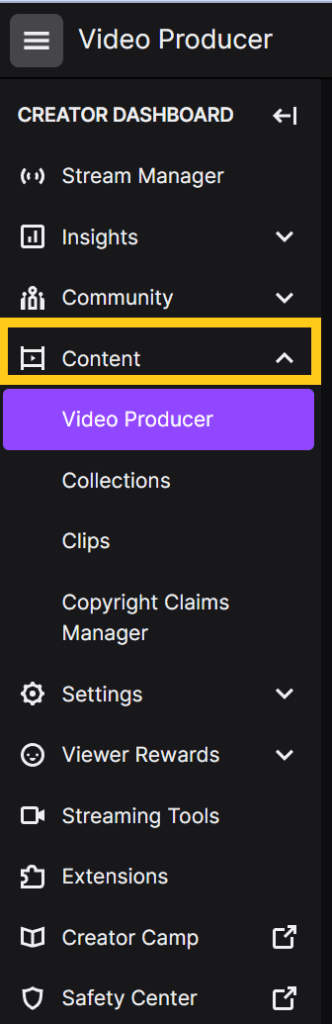
- On the left side click on “Content” and then “Video Producer”.
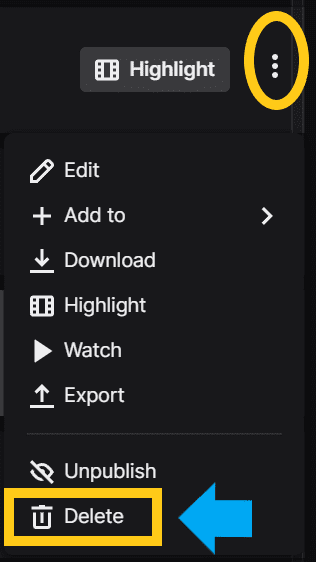
- Find the VOD you want to delete and click the three dot button next to “Highlight”.
- Click “Delete”.
- Confirm you want to delete the VOD.
Here are some screenshots that provide some more detail:
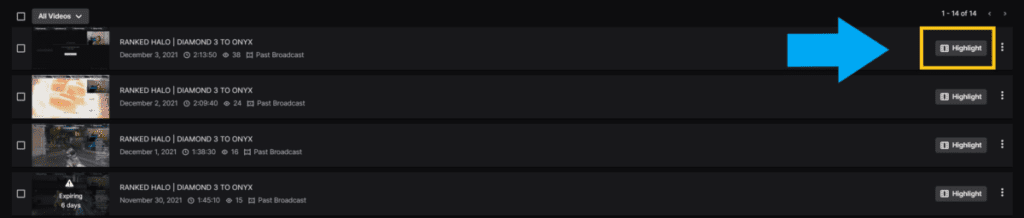
Log into your Twitch account. Click on your profile icon and go to your “Creator Dashboard”.
On the left side click on “Content” and then “Video Producer”.

Find the VOD you want to delete and click the three dot button next to “Highlight”. Click “Delete”.
Confirm you want to delete the VOD.
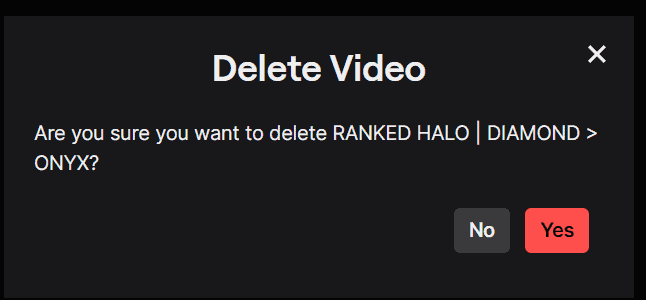
Make sure that you are absolutely certain that you want to delete a VOD because once you do it is gone for good.
As you probably already know, VODs will also delete themselves automatically after a certain amount of days, but see below as I go over ways in which you can keep VODs past the 60 days for affiliates or 90 days for partners.
How To Keep Twitch VODS For Longer Than 60/90 Days
To keep Twitch VODs for longer than 60 days if you are a Twitch Affiliate or 90 days if you are a Twitch Partner you can either download the VOD onto your computer or turn the VOD into a Twitch highlight. Highlights on Twitch do not expire so it will stay on your channel until you delete it.
Let me show you how to do each down below.
How To Download Twitch VODS
- Log into your Twitch account.
- Click on your profile icon and go to your “Creator Dashboard”.
- On the left side click on “Content” and then “Video Producer”.
- Click on the VOD you want to download.
- Now click download at the top.
- The VOD will begin to download.
Here are some screenshots that go into more detail for you:
Log into your Twitch account. Click on your profile icon and go to your “Creator Dashboard”.

On the left side click on “Content” and then “Video Producer”.
Click on the VOD you want to download. Now click download at the top.
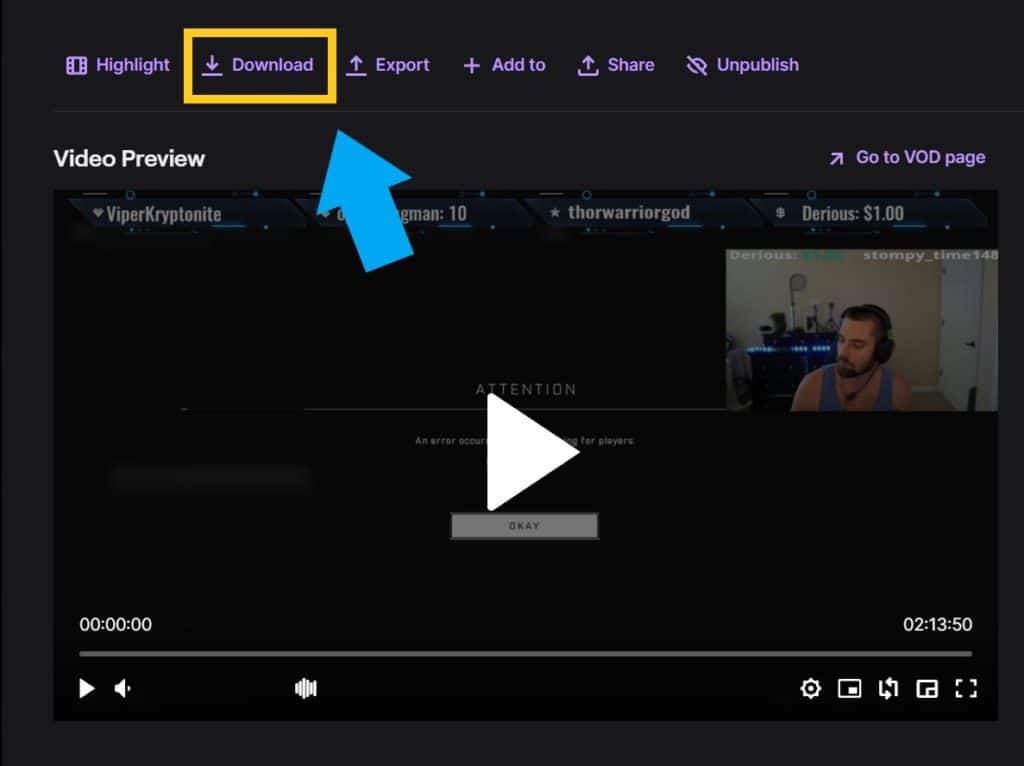
The VOD will begin to download.
Be aware though when downloading a Twitch VOD that the longer the VOD is the longer it will take to download. I downloaded a 2 hour VOD and it took a few minutes before it downloaded to my PC.
Also, how quickly the VOD downloads will depend on your internet connection and the quality of your PC.
If you do choose to download your VODs then I highly recommend that you get an external hard drive to save them on. VODs can be quite large and will take up space on your computer quickly if you are not careful.
When it comes to external hard drives I recommend the Seagate Portable Hard Drive (click here to see it on Amazon). It’s a brand you can trust and they have hard drives of all different storage sizes to better fit your needs.
And whenever you are ready to upload or edit some content you just plug in the hard drive and go to work. It’s fast, simple, and is the same hard drive I use to save all my streaming content.
As you probably have heard before, if you want to grow as a streamer, TikTok or Youtube content is a must. Having an easy place to go to to find content for these platforms makes your life as a streamer a lot easier. Trust me.
Now if you don’t want to download the VOD, but you still would like for it to remain on Twitch, here is how you would do that.
How To Turn A Twitch VOD Into A Highlight
- Log into your Twitch account.
- Click on your profile icon and go to your “Creator Dashboard”.
- On the left side click on “Content” and then “Video Producer”.
- Find the VOD you want to turn into a highlight and click the “Highlight” button.
- Make the edits you want to make and then click “Publish Highlights”.
Here are some screenshots that provide some more detail for you:
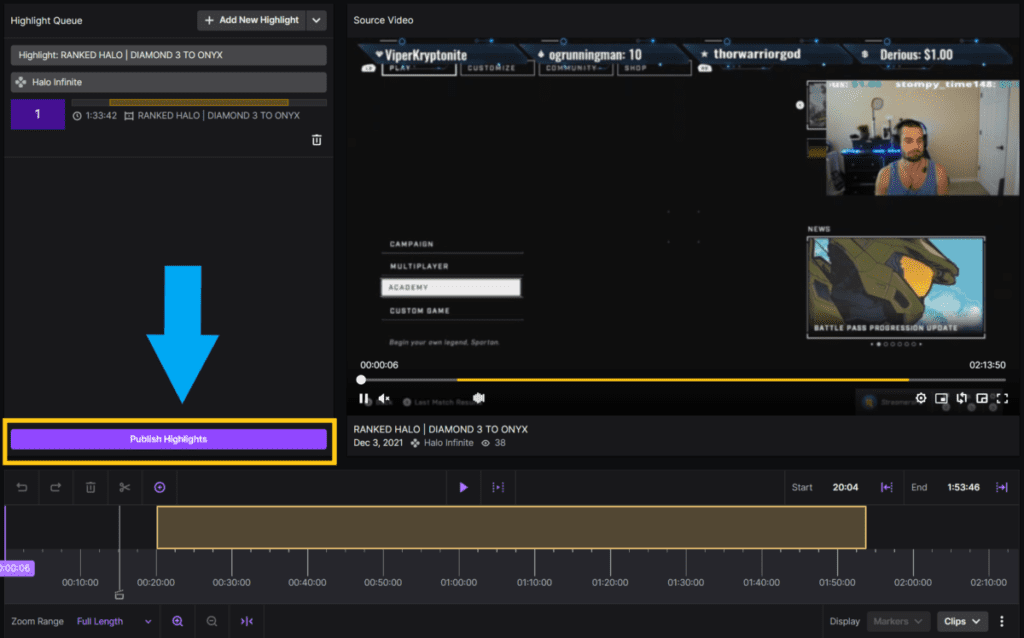
Log into your Twitch account. Click on your profile icon and go to your “Creator Dashboard”.

On the left side click on “Content” and then “Video Producer”.

Find the VOD you want to turn into a highlight and click the “Highlight” button.
Make the edits you want to make and then click “Publish Highlights”.
Once you click “Publish Highlights” the VOD will then be saved as a highlight. And just so you know the longer the VOD is the longer it will take to be uploaded to your Twitch channel. It is not uncommon to take several minutes.
Unlike VODs, Twitch highlights do not expire and will remain on your channel until you delete them.
Although you can save a VOD as a highlight to make it last longer, I recommend just downloading the VOD and storing it that way if it is a VOD you really want to hold on to.
In my experience, VODs are only relevant on your channel for a few days for those who want to catch up on things they missed on your most recent streams. After a few days nobody really watches them and they just sit there.
I think clips and shorter highlights are better options if you are looking for content on your channel.
What Are Twitch VODS Used For?
Twitch VODs can be used to give people a chance to watch some of your old streams while you are not live. VODs can also be downloaded and used to create smaller video content such as Youtube videos or TikToks.
Not every viewer can make it to every live stream and this is why VODs are nice. People who can’t watch your live streams can instead go back and watch some of your old VODs to see what they missed.
I showed you how to remove some of your old VODs, but if you want to know how to delete old clips or highlights on Twitch then check out the links provided.
For even more streaming tips and how-to content check out my Youtube channel here. And if you want to check out my streams then stop by my Twitch channel here.
Eric streams 3 days a week on Twitch and uploads weekly to Youtube under the moniker, StreamersPlaybook. He loves gaming, PCs, and anything else related to tech. He’s the founder of the website StreamersPlaybook and loves helping people answer their streaming, gaming, and PC questions.

How To Delete Twitch Clips? | Simple Guide – Streamers Playbook
Wednesday 8th of December 2021
[…] link to How To Delete Twitch VODS | Simple Solution […]
How To Delete Twitch Highlights | Easy Guide – Streamers Playbook
Wednesday 8th of December 2021
[…] link to How To Delete Twitch VODS | Simple Solution […]